


In this tutorial, I will show you the steps I took to Design a
Supernatural Angelic Scene with Fiery Effect in Photoshop. This is an
intermediate level tutorial so some steps can be a bit tricky, but why
not have a try
Along the way, we will go through how you can combine custom brushes
and manipulate stock images to create some nice special effect for your
design, as well as layer masking and image adjustments.
Designers who create a lot of flyer printing for clients know this tutorial will come in handy.
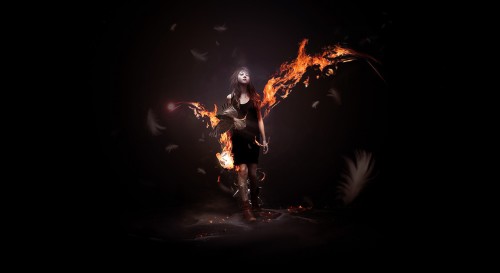
Here is a preview of the final effect I have for this tutorial: (click to enlarge)
Cold Version

Warm Version
Ok Let’s get started!
To complete this tutorial, you will need the following stock: (registration required for those images)
Crack Brushes
Model
Fire 1
Fire 2
Crow
Feather Brush
Step 1
Create a new document sized 1280px * 700px with black background,
create a new layer and use a soft white brush to paint some background
light on the centre and bottom of the canvas, use free transform tool to
adjust its shape when necessary:
<blockquote>Hint: you can paint the centre light first, then
duplicate this layer and use free transform tool to compress it down to
form the bottom part. Set the layer opacity to around 20%.</blockquote>

Create a new layer and use the crack brush (choose one from the pack)
to paint some crack patten on the ground: (Make sure you adjust its
shape with a bit of distortion, otherwise it won’t look good.)

I decide to add some fire particles on the ground – load the Fire 1
image into Photoshop, use Quick Selection tool to select a portion of
the image as shown below:

Copy and paste the selection onto our canvas, distort it as shown below:

Hit Ctrl + L to bring up the levels adjustment tool, apply the following settings:

Reduce the layer opacity on this layer to around 80-90%, then use the
crack brush as eraser, remove some part of the fire texture:

and here is the effect so far:

Step 2
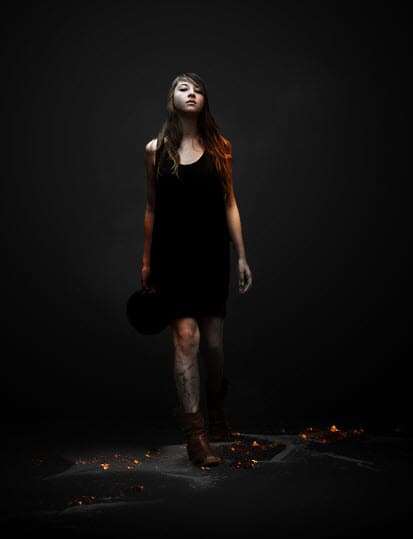
Load the model image into Photoshop, cut out the model and paste it to the centre of our canvas:

Tidy up the image, then use crack brush as erase to erase a portion of the model’s leg as shown below:

Add the following 3 adjustment layers as clipping mask to the model layer:
Black and White
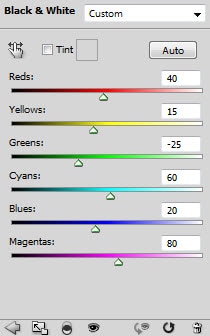
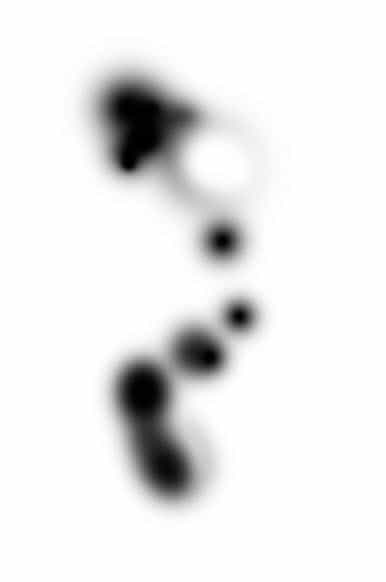
Mask on the Black and White adjustment layer:

Levels

Mask on Levels adjustment layer:
Curves

Now as you can see, the colour on the left shoulder and the right
forearm area is distinctively different from the rest (a kind of burnt
effect) – there are the places we will would be having the fire effect:
Use a soft white brush to paint some light effect behind the hat, use
a soft black brush to add some shadow under the model’s feet area, and
paint some more crack texture behind the legs for more effect:

and here is the effect so far:

Step 3
Now we can add some flying fiery effect around the girl model to make
the photo look more supernatural. Load the Fire 1 image into Photoshop
and use the Lasso Tool with around 30% feather to select a portion:

Copy and paste the selection onto our canvas, put the new layer below the model layer, and distort its shape as shown below:

I decide to warp the fire texture so it is to form a wing-like shape:

Optionally, you can use the liquify filter on the fire wing tip to add some motion:

Add the following 2 adjustment layers as clipping mask on this new fire layer:
Curves
Color Balance

and here is the effect you will have so far:
Put the fire layer and its adjustment layers into a folder, duplicate
the folder and flip it horizontally, resize and attach it to the right
arm area:

Step 4
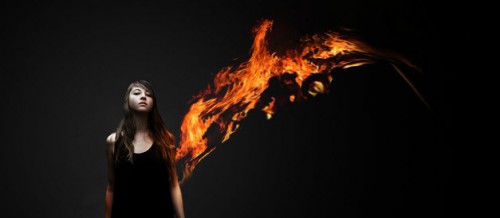
Now we can add some fire around the right arm. Load the Fire 2 stock
image into Photoshop, copy and paste the entire image onto our canvas,
resize and move it to the position shown below: (set layer blending mode
to “lighten”)

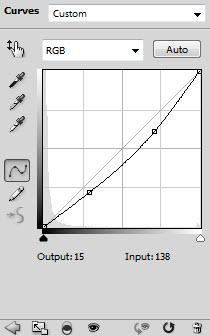
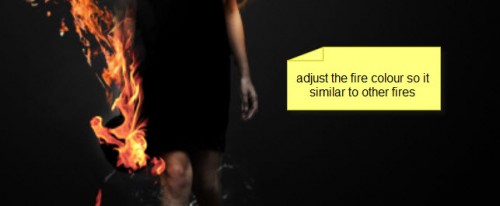
Use image adjustment tool on this fire layer and adjust its colour, so it merges with the rest of the fire around the model:
Optional: You can duplicate this fire layer, resize it to a smaller
scale, and use liquify filter to manipulate the shape of it to form some
falling particle effect:

You can also you create a new layer on top of this fire layer, and
use a soft white brush to do a single-click to the centre of the fire,
for some magical light effect:
Step 5
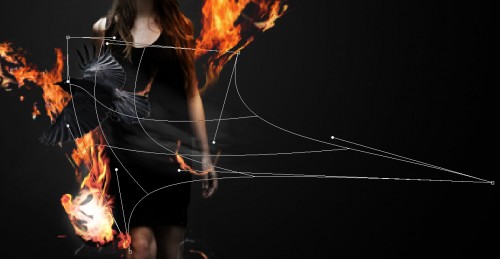
Load the Crow image into Photoshop, cut out the crow and paste it onto our canvas, resize and position it as shown below:

To add some motions to the flying crow, we can use any cloud brush to paint some cloud under the crow, then use the warp tool to warp it as shown below:
Reduce the layer opacity of the crow to around 60%, you will have the following effect:

and here is the overall effect so far:

Step 6
This step is optional. To further improve the overall effect and feel of the image, I added some little adjustments around the image.
Firstly I added some Vexel Hair on the left side of the girl: (I explained this hair vexel technique is this tutorial here in detail, check it out if you’re interested in learning this.)

I also used the Feather Brush downloaded earlier to
paint some feather around the model: (make sure you adjust the opacity
and size of the brush as you paint, you can also use brush options to
achieve this)

I further enhance the lighting and colour of the image via adjustment
layers (curves, colour balance), and here are the two final versions I
have for this tutorial: (click to enlarge)
Cold Version
Warm Version
That’s it for this tutorial! Hope you enjoy it and find it useful! Till next time, have a great day!
Supernatural Angelic Scene with Fiery Effect in Photoshop. This is an
intermediate level tutorial so some steps can be a bit tricky, but why
not have a try
Along the way, we will go through how you can combine custom brushes
and manipulate stock images to create some nice special effect for your
design, as well as layer masking and image adjustments.
Designers who create a lot of flyer printing for clients know this tutorial will come in handy.
Here is a preview of the final effect I have for this tutorial: (click to enlarge)
Cold Version

Warm Version

Ok Let’s get started!
To complete this tutorial, you will need the following stock: (registration required for those images)
Crack Brushes
Model
Fire 1
Fire 2
Crow
Feather Brush
Step 1
Create a new document sized 1280px * 700px with black background,
create a new layer and use a soft white brush to paint some background
light on the centre and bottom of the canvas, use free transform tool to
adjust its shape when necessary:
<blockquote>Hint: you can paint the centre light first, then
duplicate this layer and use free transform tool to compress it down to
form the bottom part. Set the layer opacity to around 20%.</blockquote>
Create a new layer and use the crack brush (choose one from the pack)
to paint some crack patten on the ground: (Make sure you adjust its
shape with a bit of distortion, otherwise it won’t look good.)
I decide to add some fire particles on the ground – load the Fire 1
image into Photoshop, use Quick Selection tool to select a portion of
the image as shown below:

Copy and paste the selection onto our canvas, distort it as shown below:
Hit Ctrl + L to bring up the levels adjustment tool, apply the following settings:
Reduce the layer opacity on this layer to around 80-90%, then use the
crack brush as eraser, remove some part of the fire texture:

and here is the effect so far:

Step 2
Load the model image into Photoshop, cut out the model and paste it to the centre of our canvas:

Tidy up the image, then use crack brush as erase to erase a portion of the model’s leg as shown below:
Add the following 3 adjustment layers as clipping mask to the model layer:
Black and White

Mask on the Black and White adjustment layer:

Levels
Mask on Levels adjustment layer:
Curves
Now as you can see, the colour on the left shoulder and the right
forearm area is distinctively different from the rest (a kind of burnt
effect) – there are the places we will would be having the fire effect:
Use a soft white brush to paint some light effect behind the hat, use
a soft black brush to add some shadow under the model’s feet area, and
paint some more crack texture behind the legs for more effect:
and here is the effect so far:
Step 3
Now we can add some flying fiery effect around the girl model to make
the photo look more supernatural. Load the Fire 1 image into Photoshop
and use the Lasso Tool with around 30% feather to select a portion:
Copy and paste the selection onto our canvas, put the new layer below the model layer, and distort its shape as shown below:
I decide to warp the fire texture so it is to form a wing-like shape:
Optionally, you can use the liquify filter on the fire wing tip to add some motion:

Add the following 2 adjustment layers as clipping mask on this new fire layer:
Curves

Color Balance

and here is the effect you will have so far:
Put the fire layer and its adjustment layers into a folder, duplicate
the folder and flip it horizontally, resize and attach it to the right
arm area:
Step 4
Now we can add some fire around the right arm. Load the Fire 2 stock
image into Photoshop, copy and paste the entire image onto our canvas,
resize and move it to the position shown below: (set layer blending mode
to “lighten”)

Use image adjustment tool on this fire layer and adjust its colour, so it merges with the rest of the fire around the model:
Optional: You can duplicate this fire layer, resize it to a smaller
scale, and use liquify filter to manipulate the shape of it to form some
falling particle effect:
You can also you create a new layer on top of this fire layer, and
use a soft white brush to do a single-click to the centre of the fire,
for some magical light effect:
Step 5
Load the Crow image into Photoshop, cut out the crow and paste it onto our canvas, resize and position it as shown below:
To add some motions to the flying crow, we can use any cloud brush to paint some cloud under the crow, then use the warp tool to warp it as shown below:

Reduce the layer opacity of the crow to around 60%, you will have the following effect:
and here is the overall effect so far:
Step 6
This step is optional. To further improve the overall effect and feel of the image, I added some little adjustments around the image.
Firstly I added some Vexel Hair on the left side of the girl: (I explained this hair vexel technique is this tutorial here in detail, check it out if you’re interested in learning this.)

I also used the Feather Brush downloaded earlier to
paint some feather around the model: (make sure you adjust the opacity
and size of the brush as you paint, you can also use brush options to
achieve this)

I further enhance the lighting and colour of the image via adjustment
layers (curves, colour balance), and here are the two final versions I
have for this tutorial: (click to enlarge)
Cold Version
Warm Version
That’s it for this tutorial! Hope you enjoy it and find it useful! Till next time, have a great day!

